Tuesday, June 5, 2012

Adding a hood microwave, part 2.

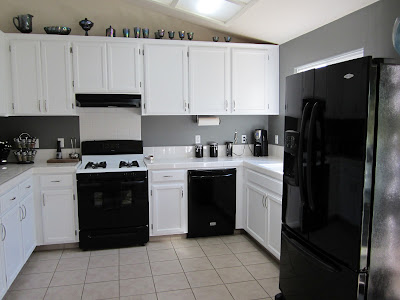
Once we got that beaut home, it was planning time. See, our current setup didn't have room for a hood microwave. It had a standard hood at a good height, but putting in a microwave would have made it rather awkward to get to anything on the back burner of the stove.


So in order to make it fit that cabinet over the hood had to go. Luckily the venting to the outside was way at the top of it so we had room to work. I figured if John could retrofit some cabinet doors, so could Clint.

First step, demo.

The worst part was removing the tile back splash. It went up so far that we had to remove a couple rows to get the microwave flush against that wall.
You know how on all the home improvement shows, they just tap the sides of the tile and they all pop out? Well holy mother that did not happen for us. That tile was stuck on their for the long haul. I ended up having to just rip out the cement board it was attached to. Not fun.

We also removed the doors and bottom of the cabinet and we were on the way.


Poor Clint was up until 4am installing a new piece of drywall and a new bottom for the cabinet. That boy won't give up until he's done. He was so proud he even took a picture (even though I would wake up and see it 3 hours later.)
 
 
A new electrical outlet and some wall brackets later, the microwave was in! (Clint just loves the way I take hours and hours of frustrating work and condense it into one sentence, lol)
 
 
Just like John did, Clint was able to cut out a chunk of the doors to shrink them down for re mounting. Now you would never know it wasn't originally built this way!
 
FUN FACT: I forgot to take pictures of the completed doors before we started on the next big kitchen project. So, I can't show a completed picture with the new doors. Oopsie!
 
It's cool, I will write up the post(s) about the next project and get those up for the entire kitchen reveal!


Monday, June 4, 2012

Adding a hood microwave, part 1.

We have been talking about adding a hood microwave for forever. We always knew we wanted to, but were waiting for the fateful day when the beast of a microwave/toaster combo we have nuked its last meal.

I bought that thing right after I moved into my first place. It was my pride and joy.


So, since my idols John & Sherry always talk about how amazing the Habitat for Humanity ReStore is, I had been itching to go and check ours out. One day on a random errand/shopping trip we decided to stop by. It wasn't looking to hot. A lot of doors and old junk. I was feeling rather bummed about it until I hear the Mr calling my name from across the warehouse.

Side note here: Clint is an amazing shopper. Maybe I just go too fast or can't focus well enough, but he can always seem to find the most awesome things hidden behind something or tucked into a corner of a shelf that I had just looked right over. Yay for that.

Anywho, I walk over and low and behold there he is standing in front of a black hood microwave. We prefer black appliances over stainless. I was skeptical but excited. We looked it all over, busted out our phones to look up the model and dragged over an extension cord to test it out. It seemed far to good to be true. I figure its gonna be crazy expensive. The new ones were listed for $800, I was sure I was gonna be giving him the big Hell No.

Clint covers the price tag with his hand and tells me to guess. I was being optimistic and said $250. He smiles and moves his hand.
 I look at it.
Figure it must be wrong.
It says $30.
That's not a typo.
Thirty.

Just to be sure there are even a couple other similar ones, same price.

I about danced my way to the register and bought that puppy. I figure even if it only lasts a year we more than got our moneys worth.


It was a good trip. Now for the real fun- installation!

Wednesday, April 18, 2012

Cabinet Paint Reveal!

So after 3 poorly documented days of work, we put our kitchen back together. This project was my birthday present and I am THRILLED with how it came out. Looking at the before pictures just blows my mind. Here  we go!

The last step before being done done was to add the new hardware. Thecabinets previously had none at all, so we had to drill the holes for the new ones. I choose a brushed nickel pull with some lttle cutouts for some visual interest

.


IMG_0281


We added them to all the drawers, and all the doors except for the ones above the stove. We have always wanted to retro fit in a microwave hood, which would mean those doors would have to go, so I didn’t bother adding the pulls.

It was fairly straightforward. Almost too easy….since the Mr got so into a groove that he was doing all the doors so fast he drilled 3 of them on the WRONG SIDE. Like, right next to a hinge a didn’t notice, lol.

IMG_0279


Now, the painting project was officially DONE!


Again, the before:


IMG_0271

Now the AFTER!


IMG_0287

BAM! How about them apples??


As you can see, we took down the cabinet over the fridge. Even 6’4” Clint could barely reach it so it was pretty useless. I love the open feeling of it being gone, and I got my beautiful glass bowl that I had been eyeing forever at Pier 1 to go on the wall.


Let’s look at some more angles :)


IMG_0284 IMG_0285


IMG_0292


There it is. We will be adding a hood microwave and someday redoing the countertops, but for now its love.

Tuesday, April 17, 2012

Cabinet Painting, Part 2

So, when we last left off, Mr Two One Ohh was starting to prime the cabinet doors with his fancy fancy sprayer.
IMG_0277

All should have been right in the world. The glorious smooth finish should have been having me dance and sing with happiness and joy. Alas, it was not to be.

See, by deciding he needed the fanciest sprayer they sell at Home Depot, Mr had gotten one that has a pump and a very long hose. Why is that a problem? It takes half a gallon of paint to get the thing to start spraying. Which meant 1 coat of primer on the backs of the doors took an ENTIRE GALLON of primer. No bueno.
This sprayer was supposed to be used in a 5 gallon bucket, where you had a long way to go in the can. We did not. It was a disaster. After much hemming and hawing I told him we executive decided the sprayer had to go. If John & Sherry can do it with a brush and roller, so can we!
This was all good until the next morning when we went to flip over the doors.
(For those of you wondering about the cabinet boxes, I had primed those by hand in no time flat, rather uneventfully.

IMG_0274

SO! Saturday morning was here and we went to flip the doors. For those of you who aren’t big painters, here's the thing. Primer is sticky. That’s its job. To make paint stick to it. Imagine with me if you will, a cocoon of plastic tarping making a little room which had been sprayed with copious amounts of primer. As soon as you walked in your feet stick to the covered-in-overspray ground.
It was rather unpleasant, but carry on we must. We flipped the doors over and spent the day priming the fronts.
The trouble came when it was then time to flip them back over for paint. Remember our fancy lifters from part 1, soda cans and Solo cups? Well the primer had  done its job and they were all stuck to the primed back of the doors. Like, we had to pull them off which left rings of bare wood on all the doors. I.was.PISSED. My poor mister got a full on temper tantrum directed at him for his decision to use a “stupid mother effing expensive damn sprayer” when I wanted to do it by hand in the first place. I’m not proud of it.

We soldiered on. We had to do a light sanding and re-prime the spots that were damaged and wait for it to dry again. We also had to replace all the plastic that was under the cabinets with fresh un-sticky stuff so we had somewhere to lay the doors that wouldn't cause the same problem again.

Then came the paint. We went with the same paint John & Sherry used. Seriously, don’t take my post as a tutorial. I’m not a good teacher. Just read theirs. We just tried to do everything they said to do.
Just like the primer, the paint went on the boxes smooth as butter in no time flat. If we didn’t have doors this would have been the easiest project ever.

IMG_0273 
The doors were tedious, but we got it done. It was a whole lot of roll, brush, dry. Over and over again.

Now we are ready for the fun part….the reveal!

Monday, April 16, 2012

Cabinet Painting, Part 1


So, the weekend was finally here. The Mr and I had both taken Monday off work so we could rock this project out with our full concentration. In case you have forgotten, here is what we started with (after heavy cleaning and light decorating)
IMG_0271

This is what we worked with for the fist year and a half of living here.  Perfectly functional, but not so pretty. So, we made the decision to paint the cabinets. They were in great shape (the house was only built in 2006 people) plus we are super cheap so it was a go. We had actually talked about it since we first got the house but knowing what a huge project it was just kept putting it off. That is until my idols, the Brand and Angelina of blogging themselves John & Sherry did their kitchen cabinets. then I was all….its on.
So! By the time Clint got home from work Friday I had already removed all of the door and hinges from the kitchen.

IMG_0272

Which I promptly took no pictures of. But trust me, its alot of doors.

Then we spent far too many hours cleaning, sanding and deglossing all the surfaces. Thank baby Jesus for deglosser. We only had to do a light sanding because of it. It made the job much, much easier. Now on to paint!

So the Mr, being the gadget-o-phile he is decided we should buy a paint sprayer for the job. He also decided we needed the heavy duty professional kind that sucks the paint right out the the can (no pouring!)
After taking all the doors down, I began to set up the Dexter kill room paint booth in our garage.

IMG_0276

Notice our very professional door lifters, empty soda cans and beer pong cups. What you see there is about half the doors. The ground was also covered in them on the other side of the tables.
So, Mr fires up his sprayer and starts getting his prime on.

IMG_0278
Looks like its going great, right??

Wrong.

See you for part 2. :-)

Thursday, March 22, 2012

Tuesday, March 6, 2012

The babies

We got a new camera in December (just a point a shoot, nothing fancy) and I have been having fun taking fancy like pictures. So here I am to share them with the world.


OK, that ones not fancy I just think its cute. My lazy family. (Yes, that is a 76lb dog asleep in his lap.)

Monday, March 5, 2012

End table makeover and new couch


So we have had this end table since…..forever. It was a hand-me-down from a friend who got it as a hand me down. It has sat in our living room holding a laptop for years. We really like that the drawer is on the shallow side so you can open it from the couch easier.
IMG_0246
It has seen better days.

Up until now though, it always sat hidden between a wall and the couch, so I didn’t really care too much about how it looked.

IMG_0790[1]

So, in plans  to get a new sectional couch, this table was now going to be front and center so it needed some attention.
I decided that I only wanted to repaint the top because I’m lazy  to give it some contrast.
After sanding , wood filling, primer, paint and polyurethane, a new knob and scrubbing down the legs and sides-

IMG_0252IMG_0254
It’s not perfect, there are still a ton of bare areas on the legs- but for now I love it. Maybe someday I will do the rest of it black, who knows.
Here is a shot of the whole room with the new couch and all (after I took off the fake staging props on the table, lol.

IMG_0248
IMG_0250

I am so in love with that new couch it’s not even funny. Partially because I got such a sweet deal on it (good price, sale day, reselling old furniture).
Yay for all being able to fit on the couch at the same time!

Sunday, March 4, 2012

House Tour- The Man Cave

Well as of last night we have hit a good “after” point for the man cave for now. Let’s start with the lovely walk though pictures:

IMG_0677IMG_0678


Ohh ya, she was a beaut.

So we started out with the room in a different layout for the first year. The TV was perpendicular to the windows, which put the chairs midway between the windows and that about took up all the room. It worked great because it left a lot of open space for when we would play the Kinect.
Except we NEVER play the Kinect. I got it for Clint for his birthday 2010. We played it for like a week, and there it sits.

So for Christmas 2011, we decided to get each other gifts that weren’t “things”. He has always wanted to work on his man cave.  In a year all we had done was put in our extra furniture and throw posters on the wall. Well we did buy 2 shelves from Ikea.

This is the only picture I have of the room from before, sorry.

IMG_0068

Obviously you can’t see the other side of the room with the massive TV.
So for his Christmas present I painted the room for him. Maybe these pictures don’t do it justice but it is a BIG room.
I first primed and painted all the baseboard and trim in the room bright white, like we are doing downstairs.
Then the weekend came and I got to the daunting task of painting the whole effing room by myself while Clint played video games to keep me company. By the last wall I was about crazy and Clint did the ceiling trim line for me.
While we had everything off the walls and the furniture moved Clint decided he wanted to try out a new furniture placement with the chair backs to the window and the TV on the wall next to the entrance (where I am sitting as I take the photo above).
We also sold an old loveseat and bought him a desk for the newly freed up space on the other side of the room.
Here he is in all his panorama-photo glory:
STA_0153 Stitch
Err… scratch that. Up to this point of the post I wrote in mid January. I promptly saved a draft and forgot about it.
Well, this weekend in the process of getting a new living room couch, we did some furniture shuffling and the room has done a little changing again.
So here it is from another angle, behind the desk (and the Mr.'s super tall new chair)
IMG_0260 Stitch


Ya, my panorama didn’t paste together as well this time.
Clearly I didn’t dress it up. It’s a man cave. It’s the room I lovingly refer to as “the room where we keep all the crap I don’t want to look at. There are at least 20 dragons in the room. Not exactly my favorite décor choice.

Well, in a long winded post that took me 2 months to write, there it is. My husbands man cave. Where he happily goes and plays loud games that I don’t have to see or hear. Pure Bliss Smile

Thursday, February 9, 2012

Swing, Swing


I think I am starting to catch up to my age.

I have always been an “old soul”. I did everything much younger than most, and I behaved and thought like someone much older than myself. I’m sure it started because my siblings are 9 and 12 years older than me, so I was mostly exposed to people older than myself.

I was always a few years ahead in school. I had my ‘rebellious’ stage of drinking and promiscuity in the 8th grade. I graduated at 16. I moved out on my own at 17. My best friend for the last 4 years was over 20 years older than me. I bought a house at 24.

I am about to turn 26, but have been a responsible on-my-own adult for almost 10 years.

I have always been ok and happy about that. It’s just me.

I think it’s starting to catch up to me. I find myself more and more now missing the feeling of being ‘young’. I want to go out, I want to dance and sometimes I even want to drink. I want to be able to act 26, but now I don’t have those kinds of friends. I am one of the very few people I know that doesn’t have young kids. My whole life I was always the first one of my age to do things. Now I’m looking at starting a family in my 30’s, when all my friends will have kids old enough to take care of themselves.

When I hang out with my friends now, I find that we spend more time saying “remember when?” than we do making new memories.


It just feels weird. I’m not used to it and I wanted to vent. I just heard a song that reminded me of the time when I used to be wild and care-free and it made me miss it more than usual.


Have you ever felt that way?

Friday, January 27, 2012

A quick makeover

When I was working on making over Clint’s man cave, I decided this little table could use a facelift too.

Before it was wobbly, warped, ugly and for some reason someone had done wall texture on the top of the table.

I didn’t take a before….I know, I know…. but I found it in an old picture.

IMG_0051

That sexy leg is not mine, it’s our friend Andres’. He is also responsible for the beer and chewing tobacco, neither of which the Mr or I partake in.


Anywho- I had to sand down the top 50 million times to try and smooth out the texture, add in support screws to all the legs, cut a  new bottom shelf out of plywood, prime and paint the whole thing.

It was a pretty easy project I did over the weekend in between other stuff.

Here it is all done up and back in it’s natural habitat:


IMG_0152

IMG_0151


It is now right next to his god awful ugly disgusting favorite leather recliner that he sits in when he is up there. It holds controllers, the battery charger, our modem and his game cheater book.

It’s not the most glamorous makeover ever, but it made him happy and it was totally free to do.


For those of you who haven’t dug through my archives, I actually re did some other furniture before. Check out  Our entryway mirror, The entryway table and  my nightstand.

Anyone else do any fun makeovers lately?

Thursday, January 26, 2012

An unwelcome interruption

So, the other evening I went to take a nice refreshing shower after my workout.


You know what is not fun? The smoke detector going off while you are in the shower. You know what’s worse? When your detectors are wired together so all Seven  of the smoke detectors go off at the same time. They also can’t be turned off until it detects clean air.


Now, I know they are great for protection and I am very glad they are there.  But when you have a head full of shampoo and have just put on your fancy face scrub and there is no fire……its not the time.

IMG_0147

See, the detector is right outside the bathroom door in our bedroom. Apparently (according to the Mr)  the sensor must be dirty and it detected the steam as smoke.

I wish I had a hilarious action shot of me jumping out of the shower dripping wet and fanning the detector to get it to stop, but I guess you’ll have to use your imagination.

Anyone ever have a smoke detector mishap?

Monday, January 23, 2012

Office Fun

The ways I amuse myself at my office job-

When a telemarketer calls and asks for the owner, give them the weirdest most random name you can think of.
Then when they call back and have to ask for said-weird-named person, tell them there is no one here by that name, hang up and then laugh, laugh laugh.

Ya....it's the little things.

I'm stalling

So, we did have an eventful weekend of painting the front wall of the living room. Alas, the Mr didn't get the doorbell or motion sensor re-mounted or put my glass vases back up on the shelf above the closet. So I don't have after pics for you just yet.

Sneak preview!

Instead I shall give you pictures of my adorable family. Because it's my blog and I can.


Allie. Her favorite hiding place in the house. She was PISSED that I busted her out.


Henry. He has both front legs, I swear.


Roxie. Her face is kinda weird in this picture.


Nope, still weird. That dog is just not photogenic.


Well, to at least keep this post semi house related I shall share an awesome tip I learned this weekend.


If your paintbrushes are all hard and caked with paint, put them in a saucepan of hot vinegar. Soak for 1 hour, then simmer for 10 minutes. Wash with soapy water and the old paint will come off and your bristles will be soft again.  YAY!

(FOR WATER-BASED PAINT ONLY!)